Before we begin, I’ll tell you first the origin of the favicon…
What is a Favicon?
A favicon or also known as “Favorites Icon” is a small graphic that is associated with a web page or a whole website. Sometimes favicon is also known as a shortcut icon, website icon, URL icon or a bookmark icon. It is normally sized at 16×16, 32×32 or 64×64 pixel square icon. Most site favicons are designed as a small rendition of their logo or other branding mechanism. They are seen on tab bars, bookmarks or favorites menu/manager or even on your RSS feeds like Google Reader and others.
Origin of Favicon
Favicon was first developed in Internet Explorer or IE browsers, where-in they call bookmarked websites as favorites and favicon was the icon that was displayed in the favorites menu.
Example of a Favicon Image

Favicon from popular websites
![]()
Favicon of Google, Bing, Yahoo, Microsoft, Apple and Amazon
How to create your own customized favorites icon?
Here’s a step-by-step guide on how you’ll create your own favicon using Adobe Photoshop.
1.) Create a blank pixel square icon image (Ex. 64 x 64 pixels)
- Open Adobe Photoshop
- Go to File » New or press Ctrl + N
- Change Preset to Web
- Set the Width and Height to 64 pixels
- Then click OK
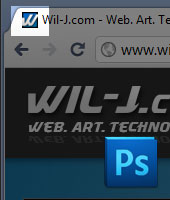
2.) Create your desired design
- Use your logo or any branding you think that may best describe your content or website like what I did to mine.
- Example design: (derived from my logo)

3.) When done with the design, Save it as a .ICO, .PNG or .GIF (Just choose one)
Note: When saving, internet browsers only accept three types of file. The .ICO is the format compatible with all browsers from old to new. Next to that are the .PNG and .GIF formats but sometimes it has compatibility issue with older browsers especially with Internet Explorer or IE Browsers.
- To save as .ICO
- First you need to download the ICO (Windows Icon) file format plugin for Photoshop
– Download ICO File Format Plugin for Photoshop by Telegraphics.com.au
– Instructions on How to Install - After installing, you need to close your Photoshop application, then open it again for it to take effect and for the option on saving .ICO format would appear on the Save As menu
- After restarting Photoshop, open your favicon design file
- Go to File » Save As and then change Format to “ICO (Windows Icon) (*.ICO;*.CUR)
- Then locate where you want to save it
- File Name should be favicon.ico
- Press Save
- First you need to download the ICO (Windows Icon) file format plugin for Photoshop
- To save as .PNG
- Go to File » Save for Web & Devices
- Set Preset to PNG-24
- Press Save
- Locate where you want to save it
- File Name should be favicon.png
- Press Save again
- To save as .GIF
- Go to File » Save for Web & Devices
- Set Preset to GIF 128 Dithered
- Press Save
- Locate where you want to save it
- File Name should be favicon.gif
- Press Save again
4.) Setup favicon on your webpage or website
Note: There are two ways you can setup your favicon to display on your website/webpage, Globally or Per Page.
Globally – Would only need to set it once and your favicon will be displayed across all your webpages.
Per Page – Would need to be declared per page but the advantage of this is that you can customize your favicon on a per page basis.
- Setting your Favicon Globally (For .ICO format only.)
- Upload your favicon.ico via FTP to the root directory
– Depends on your web hosting, but these are the common root directory public_html or www folder
– Once uploaded, your favicon will be shown across all your web pages
- Upload your favicon.ico via FTP to the root directory
- Setting your Favicon Per Page (For .ICO, .PNG and .GIF formats.)
- Upload your favicon to your desired location
– You can put it anywhere you like, for example under /images folder or anywhere you want - Put these codes inside <head> </head>
– You’ll only need to follow one example depends with file format you chose
- Upload your favicon to your desired location
Example .ICO format (favicon.ico was uploaded under /images folder)
– Cross browser compatible; Internet Explorer, Chrome, Firefox, Safari, Opera and other Internet Browsers
[code]
<head>
<link rel=”shortcut icon” href=”http://www.yourdomain/images/favicon.ico” />
</head>
[/code]Example .PNG format (favicon.png was uploaded under /images folder)
– Not supported on Internet Explorer or IE Browsers
<head>
<link rel=”icon” type=”image/png” href=”http://www.yourdomain.com/images/favicon.png” />
</head>
[/code]Example .GIF format (favicon.gif was uploaded under /images folder)
– Not supported on Internet Explorer or IE Browsers
<head>
<link rel=”icon” type=”image/gif” href=”http://www.yourdomain.com/images/favicon.gif” />
</head>
[/code]You can use both ways, Globally and Per Page especially if you want your other web pages or sub-directories to have a different favicon than the one used globally.
Before reloading your page, clear your browser cache for you to see your new customized favicon.
YOU ARE DONE!!!
If you have questions feel free to ask or comment below.